While developing our new ChatGPT Plugin Creator feature, we have learned a thing or two about the best ways to optimize any API and use it on ChatGPT. The main lesson learned is: you don’t need to make drastic changes to your API — or make a new one — in order to create a workable plugin. In a matter of mere hours, and by following just a few steps, you can develop something to be used by your end users. With the support of the use cases we have outlined, this guide will help you understand how ChatGPT works with APIs, and the best tips to apply yours. So, let’s hop on the subject and get chatting with your API!
Identify Use Cases and Endpoints Involved
Before jumping straight in, the first thing to do is some kind of theoretical exercise: what do you want to achieve with your future plugin?
Your use case has to meet the needs of your end users while adding value to your main product. At Blobr, we connected dozens of APIs to test our plugin creator, but before connecting each one, we asked ourselves: does this plugin solve a pain point? For example, creating a list on HubSpot is quite a chore. What if we could ask ChatGPT to create it for me?
To deliver this, you first need to “audit” the possibilities offered by your API: look at the endpoints and what data or action they are delivering, or ask your customers what they would love to do with your tool on ChatGPT… you can even end up better understanding your product’s pain points along the way!
Once you have zeroed in on a few use cases, see how you can implement them by using the lowest number of endpoints possible. Keeping the count of endpoints low is crucial to help ChatGPT reach the best outcome. The golden number is 3 to 6 endpoints.
You won’t necessarily be able to deliver all the use cases you want by only using a few endpoints. In this case, you have two options:
- You can drop some of the use cases and focus on the ones you deem most important.
- You can divide the use cases into two or more plugins: your users will always be able to add them to ChatGPT!
Let’s recap
1. Audit the possibilities of your API, using the documentation.
2. Identify potential use cases, based on known pain points — you can ask your users for further insights.
3. Identify the endpoints used for each use case, bearing in mind that you need to keep their number low.
4. Don’t forget: you can always create several plugins!
Rework Your OpenAPI
Great! You now have the list of the endpoints you will use for your plugin.
For the next step, you will need an OpenAPI specification file: if you don’t have one, we have created a guide to quickly create one, using ChatGPT.
→ See how to create OpenAPI specs with ChatGPT.
ChatGPT makes extensive use of descriptions to understand how to use the endpoints and convert prompt into valid requests. No descriptions, or bad ones, will result in erroneous requests and invalid calls.
The “magic” of ChatGPT is that contrary to the regulated and inflexible language of computers, you can actually use plain English to communicate with it, meaning anybody can take this step: you don’t need coding skills or a developer at hand to get it done!
The Swagger Editor is a nice tool to edit your OpenAPI. You can import it directly, make the changes, and export it in JSON or YAML. The panel on the right can help you navigate the endpoints to find the right ones.
In this editor, we will change the descriptions of the endpoints.
Editing my OpenAPI 101
So, now that you have your OpenAPI specification file, just follow these steps:
1. Go to the Swagger Editor and import your OpenAPI. You should have something that looks like this:
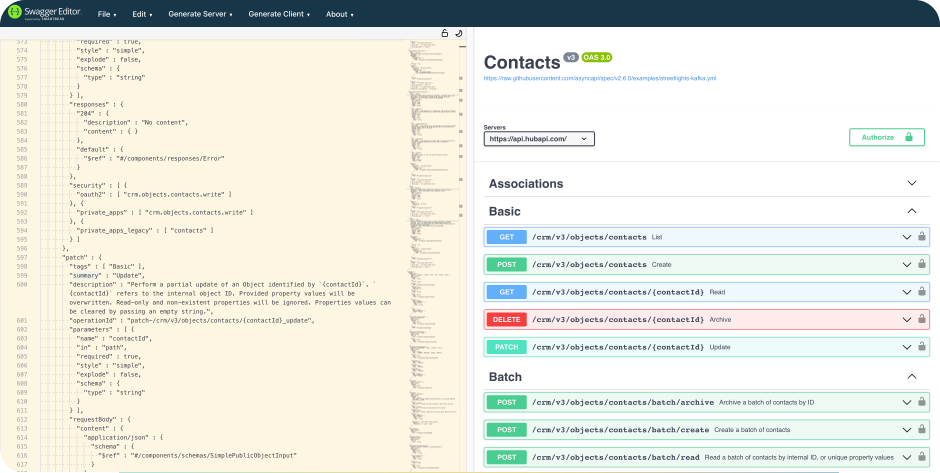
Don’t be afraid! It’s actually pretty simple: on the right you have the endpoints, identify the ones you want to change.
2. Read the descriptions: on the left panel, look for the “description” items. Are they coherent? Do they exist? Those are the ones ChatGPT will read to use the API.You can do a CTRL+F to open the Search bar on the browser to access the ones that interest you.
3. If needed, change them. You can make your API more readable for ChatGPT at several levels.Here’s an example with a POST endpoint that creates a contact list on HubSpot.
At the endpoint level:
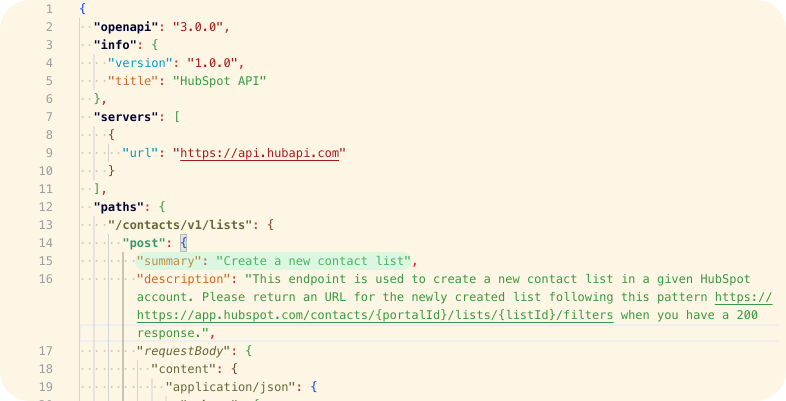
You can change the “summary" to replace it with a more actionable title. Here, the existing one is already quite self-explanatory.
The “description” is more important: ChatGPT provides latitude for you to write extensively. The limit lies north of 300 characters.
In our example, we asked ChatGPT to give its answer in the form of an URL. The original API only responds with the ID of the created list. Here, we took the pattern of the URL and asked ChatGPT to replace the variables of the URL (the {xxx} ones) with the account ID and the list ID.
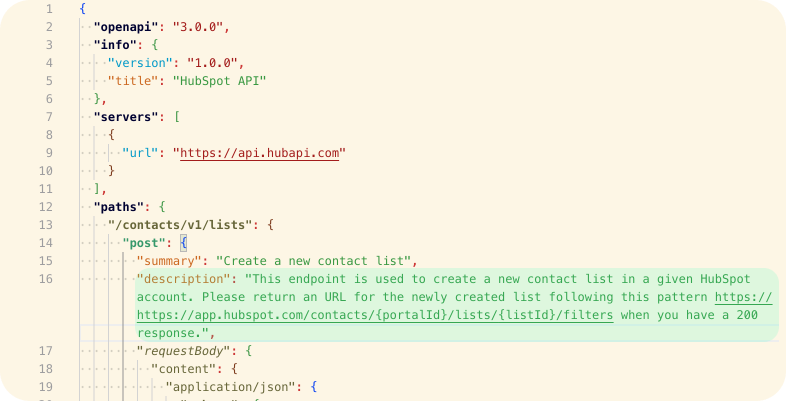
At the query parameter level:
Inside the endpoint, you will find several other parameters each with its own “description” line. You need to change them as well, to help ChatGPT understand how to use them. You can copy/ paste the existing doc.
In our example, we asked ChatGPT always to use our HubSpot ID when making a request. This saves us from giving it again in each prompt.

Repeat this for each endpoint you will use for your plugin.
4. If you’re planning on using Blobr: erase all the “operationID” for each endpoint you plan to use. Blobr will generate better ones which will improve ChatGPT’s outcome.
Here’s an example of “operationId”:

5. Once done, export the OpenAPI file in YAML or JSON format!
Filtering is Key
Congratulations! Your API is now prepared for ChatGPI!
This next part will use our tool, Blobr, to create the plugin you want. You can always make it yourself. Here’s a guide if that’s what you choose to do.
Using Blobr is simpler because it enables you to connect your OpenAPI file easily and filter in a no-code interface. As we will now see, the filtering step is very important.
An API can be filtered at the endpoint level and at the response level.
At the endpoint level, you separate the endpoints you prepared from the ones that won’t be used for your ChatGPT plugin. Keeping the number of endpoints low limits the risk of misuse of the API by ChatGPT.
At the response level, you filter all the unnecessary information (like metadata), to improve ChatGPT’s understanding of the response and the number of results handled. Filtering is important as the response size limit for ChatGPT is 100,000 characters.
→ Here’s our guide to connecting the API to Blobr.
How to do it on Blobr?
Once you have connected your API to Blobr, the next step is to create the ChatGPT plugin. On Blobr, it takes the form of a Product. Once you have started creating an API product, you can see the process here, you will be able to filter.
Back to our example: here we filtered the HubSpot API endpoints and only kept those to search, get and write contacts on CRM. The other endpoints weren’t useful to accomplish our use case.
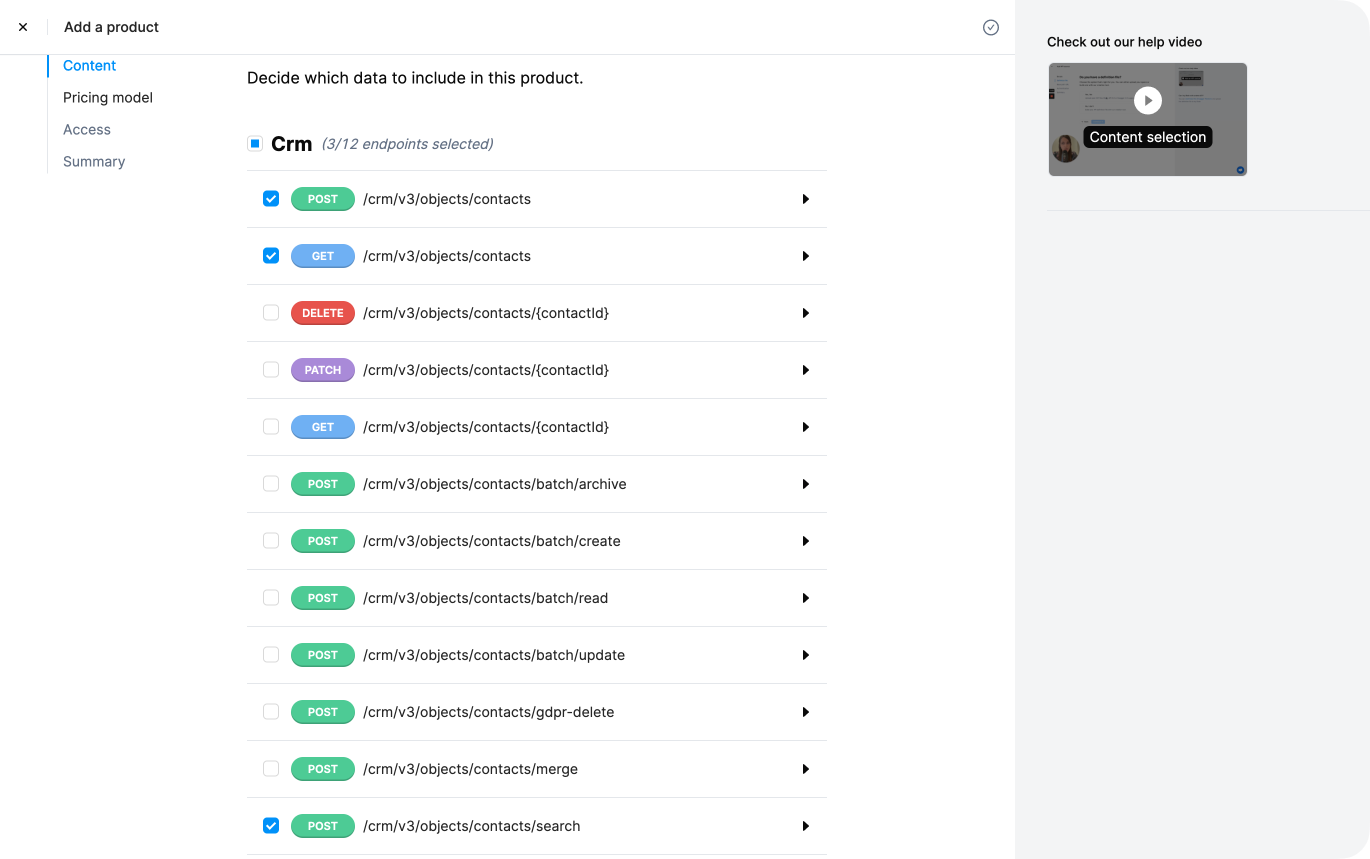
Inside each endpoint, you can filter the response as well.
Here, on the last endpoint, the search one, we filtered a lot of info to keep only what was essential: the contact ID and some values. This will render a leaner response in ChatGPT and enhance the number of contacts processed in the 100,000 characters limit.

After this step, Blobr will generate the Plugin base URL to be added in ChatGPT. Your plugin is ready!
We have made a comprehensive guide to help you create plugins on Blobr and connect them to ChatGPT.
→ Check our documentation to us how to create a ChatGPT plugin using Blobr.
Prompt Engineering the Manifest
Each plugin is composed of two parts: the OpenAPI file we just prepared and a manifest file embedding the API’s URL, contact info, the logo URL, and descriptions.
There are two descriptions: one for the humans, and one for the model.
The “description for humans” is limited to 100 characters. This is the one displayed on the plugin store, helping users understand your use case.
The description for the model can go up to 8,000 characters and acts as a very long prompt for guiding ChatGPT, to make it use the API in the most efficient way possible.
Let’s take a look at examples:
The Klarna plugin helps look for and compare products on numerous online stores. When looking for a white t-shirt, chances are you will get thousands of answers — by far exceeding ChatGPT’s payload limit set at 100,000 characters.
Klarna’s description for the model is made to help ChatGPT shape its outcome using three pre-determined steps:
- The first gives 5-10 results for the request,
- The second compares those products,
- And the third asks follow-up questions.
That way, the model incites the user to explain their request further, e.g., a white t-shirt under $5, or from a specific brand.
Tip: This GitHub repo compiles OpenAPI specs and manifests for all the public plugins. Have a look at how big names like Instacart, Expedia, or Zapier have made them!
Your manifest on Blobr
Under the Preview menu in the Product section, which is the dashboard for your plugins, you can fill in both descriptions in the following order:
- In Tagline, the “description for human”,
- And in Description, the one for the model.

Iterate to Get the Best Result
You may, by now, have made your first requests with your brand-new plugin on ChatGPT!
And you may, perhaps, be disappointed with the results… But don’t worry, this is all part of the process.
The iteration phase is crucial for producing the optimal plugin: this is when you will be able to assess any limitations in your use cases, spot potential misunderstandings from ChatGPT, and improve it.
Having a functional plugin, hallucination-free and error-proof, is close to impossible, but you can curtail errors (and already have) using this process.
The other point to remember about this phase is that you can’t change your plugin once it features on the plugin store. So, its worth spending time on this phase before submitting your plugin for reviewing.
Usually, errors come from bad descriptions but they can have other causes. There are two ways for you to understand where and why the error occurred: on ChatGPT, and — if you use it — on Blobr.
Understanding what went wrong
On ChatGPT:
You can see both the request and the response on the ChatGPT UI. They provide a fundamental source for you to understand how to debug your plugin.
In our example, we asked ChatGPT to create a list in HubSpot referencing all the contacts with an email address containing “blobr.io”. Here’s how it went on our first try:
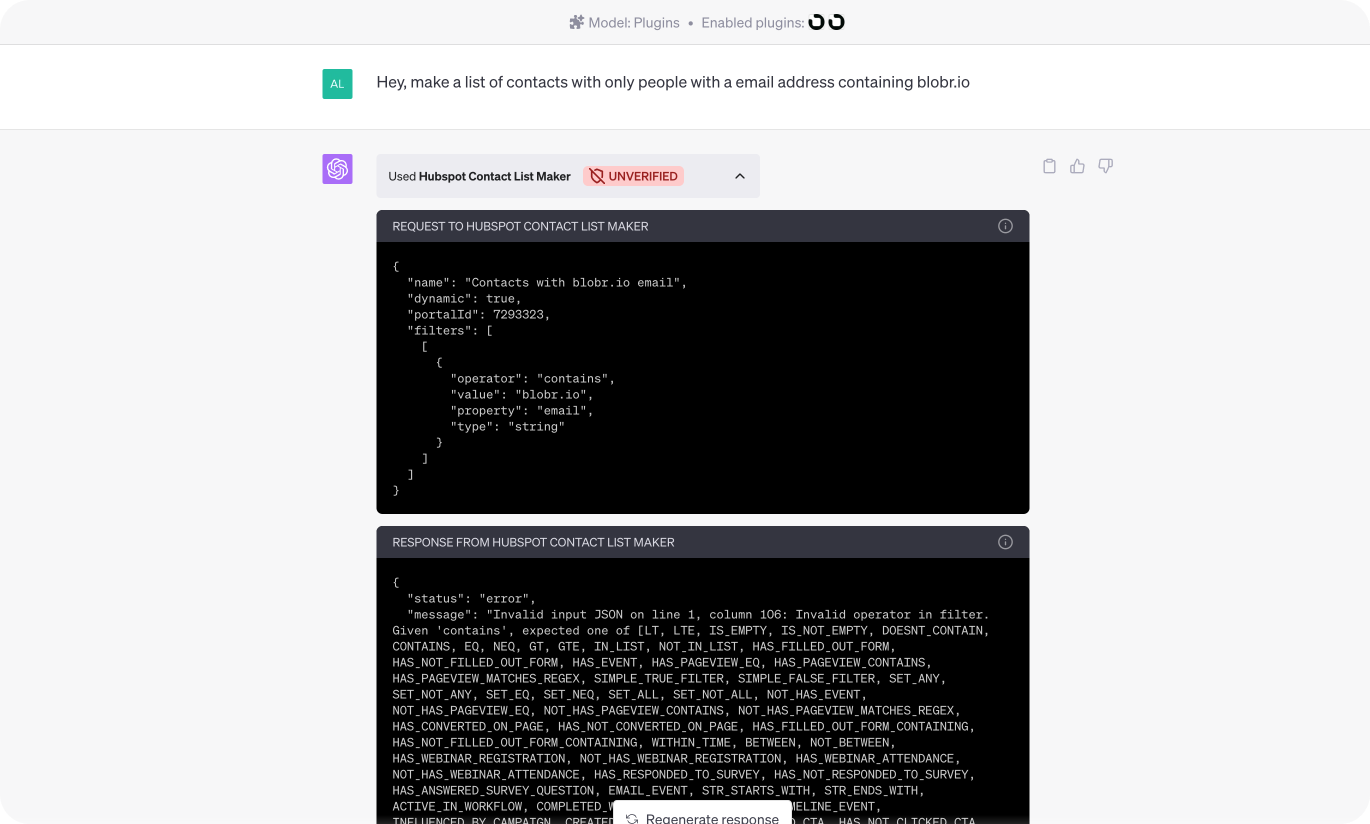
The request failed because ChatGPT didn’t enter a correct “operator”. In a case like this, the error message is enough to help ChatGPT try again. But if the error message hadn’t been there, you would have had to explain it in the description of “operator”.
In this particular case, it worked after 3 tries and produced the right outcome. But we were then faced with another issue: the answer wasn’t very useful. ChatGPT only gave us the ID of the list.
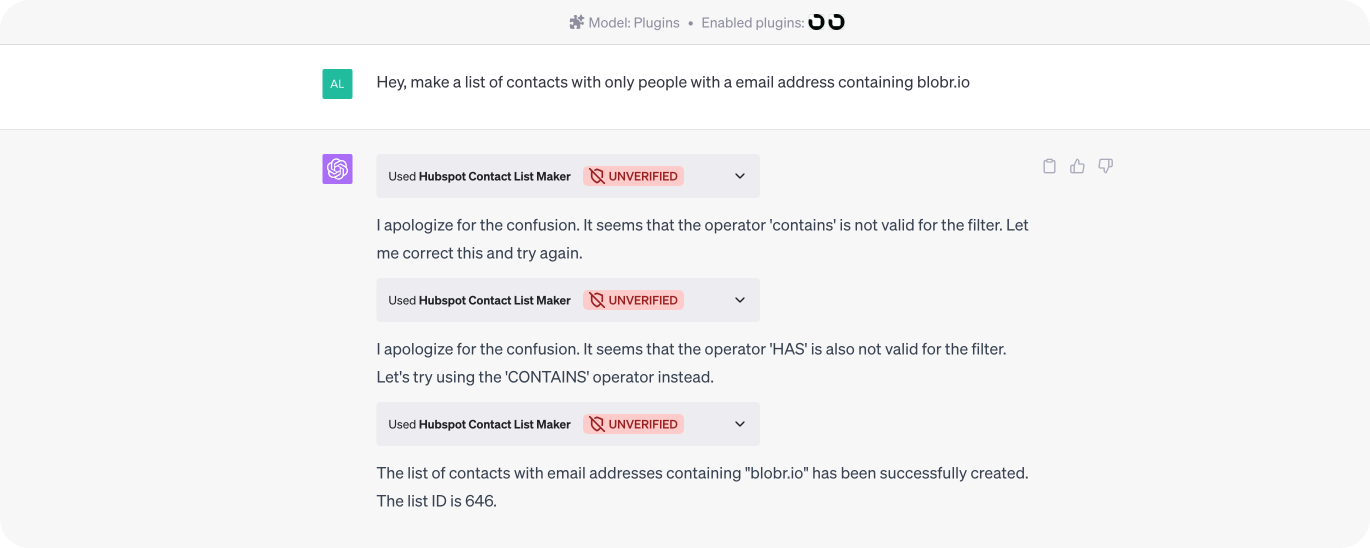
We then thought of adding the URL pattern in the description of the endpoint. This helped us improve the use case.
It now produces an URL redirecting to the created list on HubSpot!
.png)
This demonstrates how you will gradually turn your use case into reality!
On Blobr:
In some cases, ChatGPT will be aware of an issue, but won’t display the error message. You will only get a blank response.
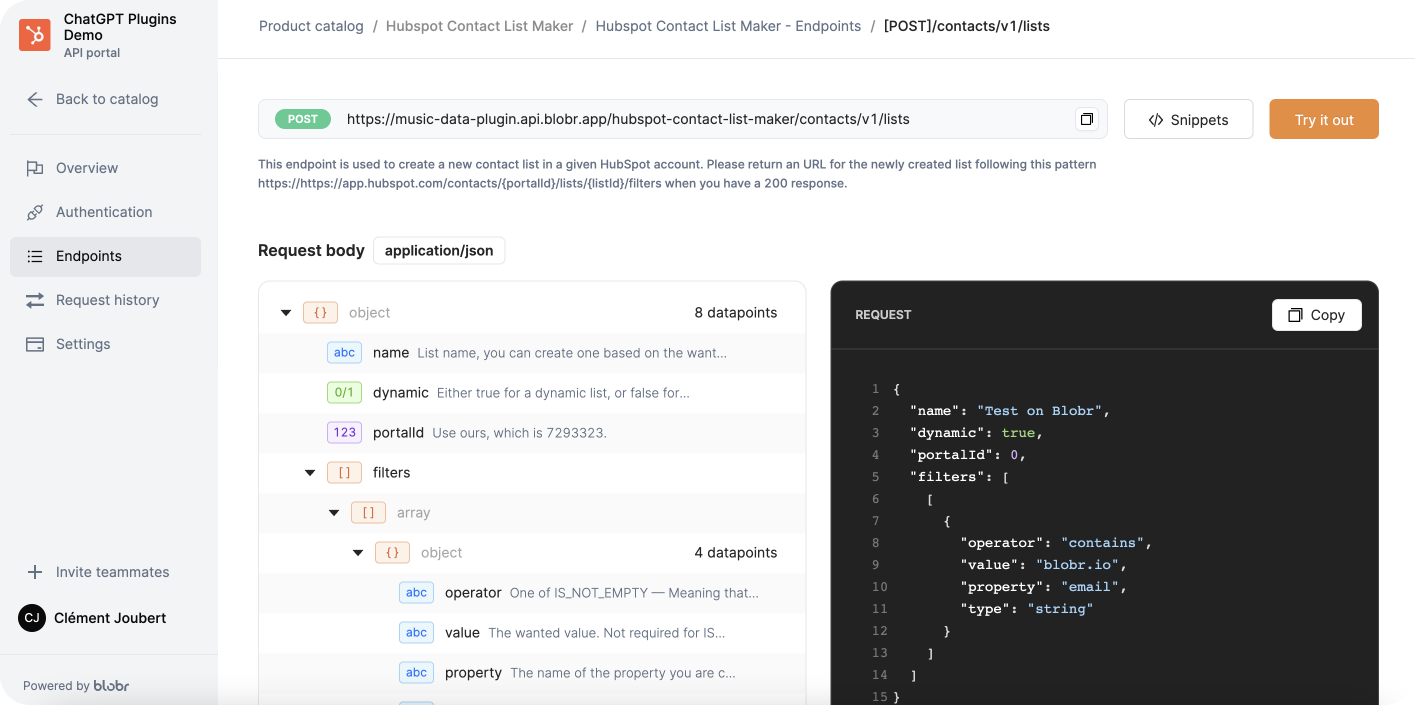
To understand what went wrong in cases like this, Blobr can help. On the API portal, you can access a log that gives you basic info about the calls and the option of making a call again to see what happened.
TL;DR
The 8 things to know before jumping in:
1 - Be use case-oriented
List your use cases, or what you wish to achieve, and check that this is compatible with the API. Make connections with other tools to create more advanced ones. Plan the number of plugins you want to create, and what they are going to deliver.
2 - Fewer endpoints
It is more effective to have fewer endpoints because it makes it easier for the ChatGPT plugin to understand and interact with your API. 3 to 6 max is key.
3 - Descriptions matters
On the OpenAPI specification file, and for each endpoint, write a complete description for ChatGPT, summing up how to use and what to do with the endpoint. And for each parameter, summarize how to use it, list the potential valid entries based on the existing API documentation (e.g. “CONTAINS” is valid only in capitals).
4 - Filtering matters (too)
Spot the useless query parameters in each endpoint, and do the same for the responses. Anything that doesn’t have a clear function will just be noise for ChatGPT. And noise leads to hallucination, which reduces the potential number of entries that can be fitted in the 100,000 characters limit for API responses. Metadata — except for certain IDs, for example, is likely to be unnecessary.
Don’t hesitate to chop to the bone: with a tool like Blobr, you can easily add or remove filters as you like, until you hit the sweet spot.
5 - Engineer your Manifest descriptions
You have an 8,000-character limit to help ChatGPT understand how to use your plugin. Use this space to explain in detail how you want it to achieve your use case. If needed, tell it the order in which to use the endpoints, or to structure the outcome. Don’t hesitate stating the obvious, if it doesn’t get how to do something, it will invent things!
6 - Learn to understand hallucinations
Sometimes, ChatGPT might "hallucinate" parameters that don't exist in your API. Instead of seeing this as a problem, consider it as a hint for potential improvements. Go back to your OpenAPI file and review descriptions to understand what went wrong: ChatGPT hallucinations are its way of saying “I don’t know how to use this”.
7 - Iterate, iterate, iterate
And once you iterated, iterate again until you get exactly the use case you want. This process is essential for you to fully understand your API, and how ChatGPT interacts with it. Learn to understand the signals, read error messages, and try things in descriptions or in the manifest — see them has lil’ prompts! If needed, adapt your use cases to potential constraints.
8 - Use ChatGPT to help you
ChatGPT is here to help you. It can produce an OpenAPI spec from your API doc. But it can also give you insight into what happened when running the plugin. Ask it what went wrong, why it made the case like this, instead of that… Your first debugging console is right there.


.jpg)
